tech explorers, welcome!

Category: Software

UNIHIKER-PAL: open-source python home assistant simplified

PAL is a simplified version of my python home assistant that I’m running in the DFRobot UNIHIKER which I’m releasing as free open-source.

This is just a demonstration for voice-recognition command-triggering simplicity using python and hopefully will serve as a guide for your own assistant.

Current version: v0.2.0 (updated september 2024)

Features

Current version includes the following:

  • Voice recognition: using open-source SpeechRecognition python library, returns an array of all the recognised audio strings.
  • Weather forecast: using World Meteorological Organization API data, provides today's weather and the forecast for the 3 coming days. Includes WMO weather icons.
  • Local temperature: reads local BMP-280 temperature sensor to provide a room temperature indicator.
  • IoT HTTP commands: basic workflow to control IoT smart home devices using HTTP commands. Currently turns ON and OFF a Shelly2.5 smart switch.
  • Power-save mode: controls brightness to lower power consumption.
  • Connection manager: regularly checks wifi and pings to the internet to restore connection when it's lost.
  • PAL voice samples: cloned voice of PAL from "The Mitchells vs. The Machines" using the AI voice model CoquiAI-TTS v2.
  • UNIHIKER buttons: button A enables a simple menu (this is thought to enable a more complex menu in the future).
  • Touchscreen controls: restore brightness (center), switch program (left) and close program (right), when touching different areas of the screen.

Installation

  1. Install dependencies :
    pip install SpeechRecognition pyyaml
  2. Download the github repo:
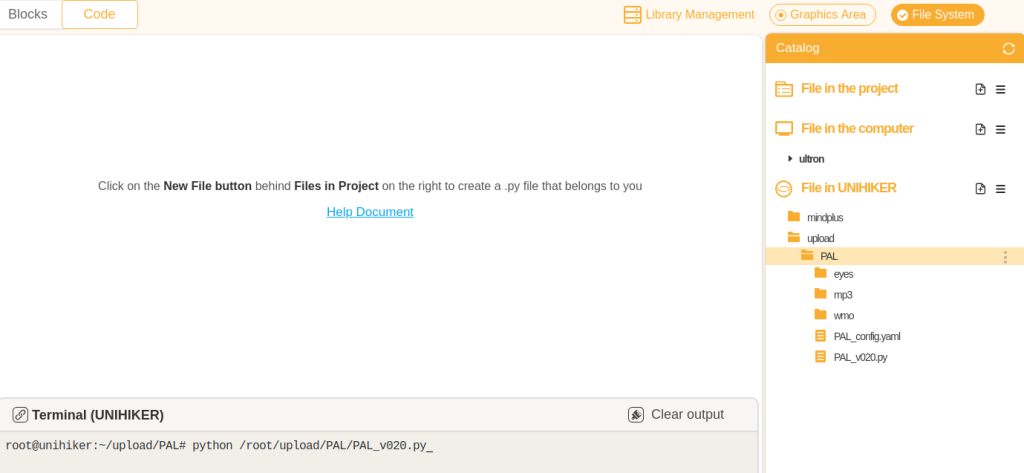
    https://github.com/TheRoam/UNIHIKER-PAL
  3. Upload the files and folders to the UNIHIKER in /root/upload/PAL/
  4. Configure the PAL_config.yaml WIFI credentials, IoT devices, theme, etc.
  5. Run the python script python /root/upload/PAL/PAL_v020.py from the Mind+ terminal or from the UNIHIKER touch interface.

If you enable Auto boot from the Service Toggle menu , the script will run every time the UNIHIKER is restarted.

https://www.unihiker.com/wiki/faq#Error:%20python3:%20can't%20open%20file…

Configuration

Version 0.2.0 includes configuration using a yaml file that is read when the program starts.

CREDENTIALS:
    ssid: "WIFI_SSID"
    pwd: "WIFI_PASSWORD"

DEVICES:
    light1:
        brand: "Shelly25"
        ip: "192.168.1.44"
        channel: 0

    light2:
        brand: "Shelly25"
        ip: "192.168.1.44"
        channel: 1

    light3:
        brand: "Shelly1"
        ip: "192.168.1.42"
        channel: 0

PAL:
    power_save_mode: 0
    temperature_sensor: 0
    wmo_city_id: "195"

Location

The variable "CityID" is used by the WMO API to provide more accurate weather forecast for your location. Define it with the parameter wmo_city_id

You can choose one of the available locations from the official WMO list:

https://worldweather.wmo.int/en/json/full_city_list.txt

IoT devices

At the moment, PAL v0.2.0 only includes functionality for Shelly2.5 for demonstration purposes.

Use variables lampBrand, lampChannel and lampIP to suit your Shelly2.5 configuration.

This is just as an example to show how different devices could be configured. These variables should be used to change the particularities of the HTTP command that is sent to different IoT devices.

More devices will be added in future releases, like Shelly1, ShellyDimmer, Sonoff D1, etc.

Power save mode

Power saving reduces the brightness of the device in order to reduce the power consumption of the UNIHIKER. This is done using the system command "brightness".

Change "ps_mode" variable to enable ("1") or disable ("0") the power-save mode.

Room temperature

Change "room_temp" variable to enable ("1") or disable ("0") the local temperature reading module. This requires a BMP-280 sensor to be installed using the I2C connector.

Check this other post for details on sensor installation:

https://theroamingworkshop.cloud/b/en/2490/

Other configurations in the source code:

Theme

Some theme configuration has been enabled by allowing to choose between different eyes as a background image.

Use the variables "eyesA" and "eyesB" specify one of the following values to change the background image expression of PAL:

  • "happy"
  • "angry"
  • "surprised"
  • "sad"

"eyesA" is used as the default background and "eyesB" will be used as a transition when voice recognition is activated and PAL is talking.

The default value for "eyesA" is "surprised" and it will change to "happy" when a command is recognized.

Customizable commands

Adding your own commands to PAL is simple using the "comandos" function.

Every audio recognized by SpeechRecognition is sent as a string to the "comandos" function, which then filters the content and triggers one or another matching command.

Just define all the possible strings that could be recognized to trigger your command (note that sometimes SpeechRecognition provides wrong or inaccurate transcriptions).

Then define the command that is triggered if the string is matched.

def comandos(msg):
    # LAMP ON
    if any(keyword in msg for keyword in ["turn on the lamp", "turn the lights on","turn the light on", "turn on the light", "turn on the lights"]):
        turnLAMP("on")
        os.system("aplay '/root/upload/PAL/mp3/Turn_ON_lights.wav'")

Activation keyword

You can customize the keywords or strings that will activate command functions. If any of the keywords in the list is recognized, the whole sentence is sent to the "comandos" function to find any specific command to be triggered.

For the case of PAL v0.2, these are the keywords that activate it (90% it's Paypal):

activate=[
    "hey pal",
    "hey PAL",
    "pal",
    "pall",
    "Pall",
    "hey Pall",
    "Paul",
    "hey Paul",
    "pol",
    "Pol",
    "hey Pol",
    "poll",
    "pause",
    "paypal",
    "PayPal",
    "hey paypal",
    "hey PayPal"
]

You can change this to any other sentence or name, so PAL is activated when you call it by these strings.
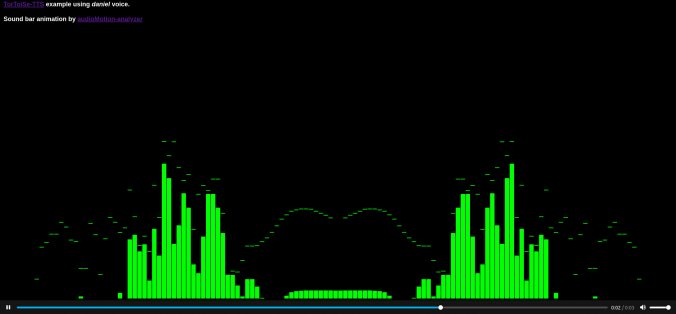
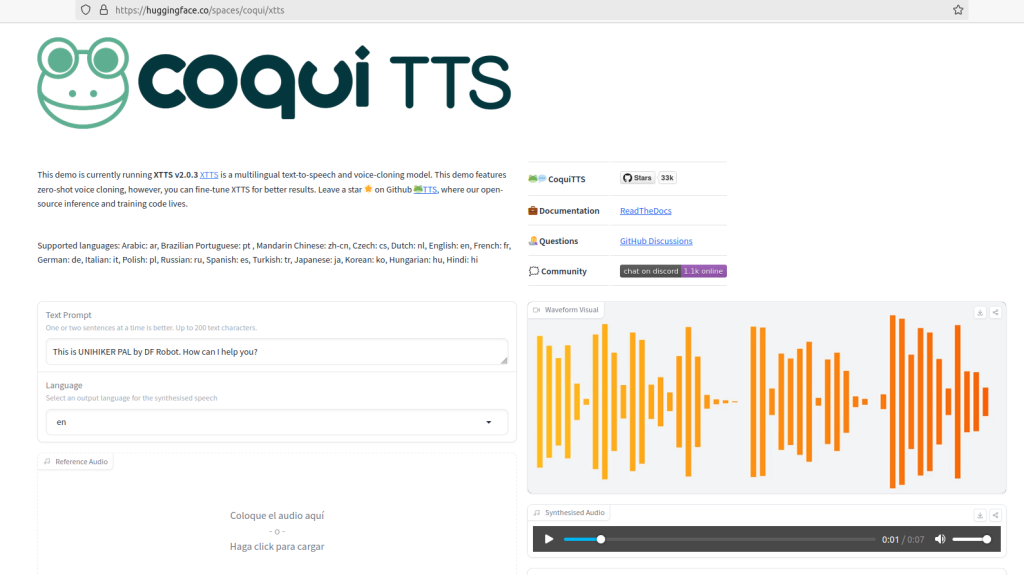
PAL voice

Use the sample audio file "PAL_full" below (also in the github repo in /mp3) as a reference audio for CoquiAI-TTS v2 voice cloning and produce your personalized voices:

https://huggingface.co/spaces/coqui/xtts

TIP!
You can check this other post for voice cloning with CoquiAI-XTTS:
https://theroamingworkshop.cloud/b/en/2425
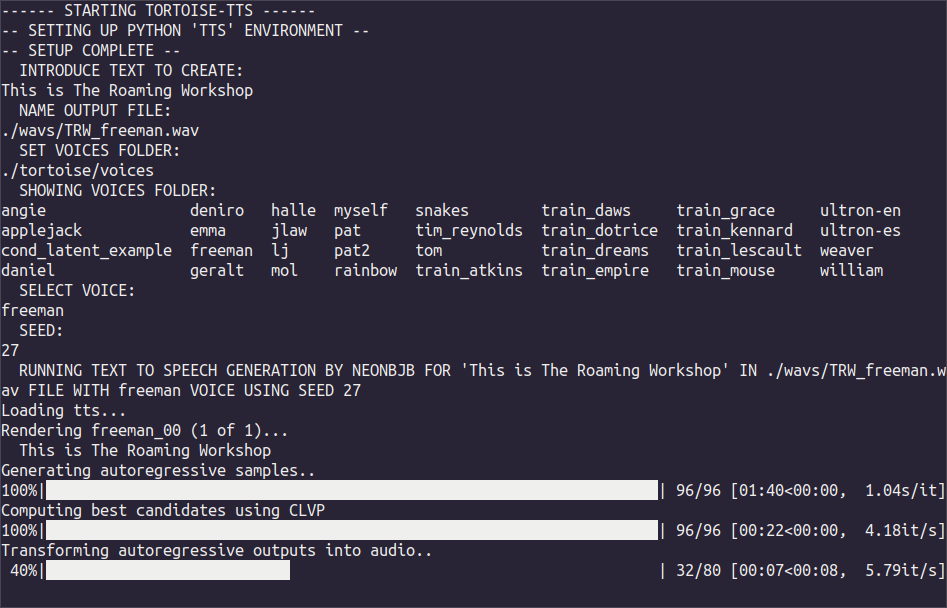
Demo

Below are a few examples of queries and replies from PAL:

"Hey PAL, turn on the lights!"
"Hey PAL, turn the lights off"

Future releases (To-Do list)

I will be developing these features in my personal assistant, and will be updating the open-source release every now and then. Get in touch via github if you have special interest in any of them:

  • Advanced menu: allow configuration and manually triggering commands.
  • IoT devices: include all Shelly and Sonoff HTTP API commands.
  • Time query: requires cloning all number combinations...
  • Wikipedia/browser query: requires real-time voice generation...
  • Improved animations / themes.

Any thoughts, issues or improvements, I'll be happy to read them via github or Twitter!

🐦 @RoamingWorkshop

🐸Coqui-AI/TTS: ultra fast voice generation and cloning from multilingual text

A few months ago I brought TorToiSe-TTS repo, which made it easy to generate text-to-speech although it only worked with english models.

https://theroamingworkshop.cloud/b/en/2083/%f0%9f%90%a2tortoise-tts-ai-text-to-speech-generation/

But AI world is moving so fast that today I’m bringing an evolution that completely exceeds the previous post, with complex voice generation and cloning in a matter of seconds and multilingual: Coqui-AI TTS.

https://github.com/coqui-ai/TTS

Web version

If you're in a rush and don't want trouble, you can use the free huggingface space and get your cloned voice in a few seconds:

https://huggingface.co/spaces/coqui/xtts

  1. Write the text to be generated
  2. Select language
  3. Upload your reference file
  4. Configure the other options (tick the boxes: Cleanup Reference Voice, Do not use language auto-detect, Agree)
  5. Request cloning to the server (Send)

Installation

Another strength of Coqui-AI TTS is the almost instant installation:

  • You'll need python > 3.9, < 3.12.
  • RAM: not as much as for image generation. 4GB should be enough.
  • Create a project folder, for example "text-2-speech". Using a Linux terminal:
    mkdir text-2-speech
  • It's convenient to create a specific python environment to avoid package incompatibilities, so you need python3-venv. I'll create an environemtn called TTSenv:
    cd text-2-speech
    python3 -m venv TTSenv
  • Activate the environment in the terminal:
    source TTSenv/bin/activate
  • If you only need voice generation (without cloning or training), install TTS directly with python:
    pip install TTS
  • Otherwise, install the full repo from Coqui-AI TTS github:
    git clone https://github.com/coqui-ai/TTS
    cd TTS
    pip install -e .[all]

Checking language models and voices

First thing you can do is to check the available models to transform text into voice in different languages.

Type the following in your terminal:

tts --list_models

No API token found for 🐸Coqui Studio voices - https://coqui.ai
Visit 🔗https://app.coqui.ai/account to get one.
Set it as an environment variable `export COQUI_STUDIO_TOKEN=`


Name format: type/language/dataset/model
1: tts_models/multilingual/multi-dataset/xtts_v2 [already downloaded]
2: tts_models/multilingual/multi-dataset/xtts_v1.1 [already downloaded]
3: tts_models/multilingual/multi-dataset/your_tts
4: tts_models/multilingual/multi-dataset/bark [already downloaded]
5: tts_models/bg/cv/vits
6: tts_models/cs/cv/vits
7: tts_models/da/cv/vits
8: tts_models/et/cv/vits
9: tts_models/ga/cv/vits
10: tts_models/en/ek1/tacotron2
11: tts_models/en/ljspeech/tacotron2-DDC
12: tts_models/en/ljspeech/tacotron2-DDC_ph
13: tts_models/en/ljspeech/glow-tts
14: tts_models/en/ljspeech/speedy-speech
15: tts_models/en/ljspeech/tacotron2-DCA
16: tts_models/en/ljspeech/vits
17: tts_models/en/ljspeech/vits--neon
18: tts_models/en/ljspeech/fast_pitch
19: tts_models/en/ljspeech/overflow
20: tts_models/en/ljspeech/neural_hmm
21: tts_models/en/vctk/vits
22: tts_models/en/vctk/fast_pitch
23: tts_models/en/sam/tacotron-DDC
24: tts_models/en/blizzard2013/capacitron-t2-c50
25: tts_models/en/blizzard2013/capacitron-t2-c150_v2
26: tts_models/en/multi-dataset/tortoise-v2
27: tts_models/en/jenny/jenny
28: tts_models/es/mai/tacotron2-DDC [already downloaded]
29: tts_models/es/css10/vits [already downloaded]
30: tts_models/fr/mai/tacotron2-DDC
31: tts_models/fr/css10/vits
32: tts_models/uk/mai/glow-tts
33: tts_models/uk/mai/vits
34: tts_models/zh-CN/baker/tacotron2-DDC-GST
35: tts_models/nl/mai/tacotron2-DDC
36: tts_models/nl/css10/vits
37: tts_models/de/thorsten/tacotron2-DCA
38: tts_models/de/thorsten/vits
39: tts_models/de/thorsten/tacotron2-DDC
40: tts_models/de/css10/vits-neon
41: tts_models/ja/kokoro/tacotron2-DDC
42: tts_models/tr/common-voice/glow-tts
43: tts_models/it/mai_female/glow-tts
44: tts_models/it/mai_female/vits
45: tts_models/it/mai_male/glow-tts
46: tts_models/it/mai_male/vits
47: tts_models/ewe/openbible/vits
48: tts_models/hau/openbible/vits
49: tts_models/lin/openbible/vits
50: tts_models/tw_akuapem/openbible/vits
51: tts_models/tw_asante/openbible/vits
52: tts_models/yor/openbible/vits
53: tts_models/hu/css10/vits
54: tts_models/el/cv/vits
55: tts_models/fi/css10/vits
56: tts_models/hr/cv/vits
57: tts_models/lt/cv/vits
58: tts_models/lv/cv/vits
59: tts_models/mt/cv/vits
60: tts_models/pl/mai_female/vits
61: tts_models/pt/cv/vits
62: tts_models/ro/cv/vits
63: tts_models/sk/cv/vits
64: tts_models/sl/cv/vits
65: tts_models/sv/cv/vits
66: tts_models/ca/custom/vits
67: tts_models/fa/custom/glow-tts
68: tts_models/bn/custom/vits-male
69: tts_models/bn/custom/vits-female
70: tts_models/be/common-voice/glow-tts

Name format: type/language/dataset/model
1: vocoder_models/universal/libri-tts/wavegrad
2: vocoder_models/universal/libri-tts/fullband-melgan [already downloaded]
3: vocoder_models/en/ek1/wavegrad
4: vocoder_models/en/ljspeech/multiband-melgan
5: vocoder_models/en/ljspeech/hifigan_v2
6: vocoder_models/en/ljspeech/univnet
7: vocoder_models/en/blizzard2013/hifigan_v2
8: vocoder_models/en/vctk/hifigan_v2
9: vocoder_models/en/sam/hifigan_v2
10: vocoder_models/nl/mai/parallel-wavegan
11: vocoder_models/de/thorsten/wavegrad
12: vocoder_models/de/thorsten/fullband-melgan
13: vocoder_models/de/thorsten/hifigan_v1
14: vocoder_models/ja/kokoro/hifigan_v1
15: vocoder_models/uk/mai/multiband-melgan
16: vocoder_models/tr/common-voice/hifigan
17: vocoder_models/be/common-voice/hifigan
Name format: type/language/dataset/model
1: voice_conversion_models/multilingual/vctk/freevc24 [already downloaded]

Or filter the result with grep, for example to get spanish models:

tts --list_models | grep "/es"

28: tts_models/es/mai/tacotron2-DDC [already downloaded]
29: tts_models/es/css10/vits [already downloaded]

Text to speech

With all this you're ready to turn text into speech in a matter of seconds and in the language of your choice.

In the previous terminal, write the following, specifying the right model name:

tts --text "Ahora puedo hablar en español!" --model_name "tts_models/es/css10/vits" --out_path output/tts-es.wav

Make sure that the output folder exists, then check your result. The first time you'll get several files downloaded, and you'll have to accept Coqui-AI license. Next, voice generation only takes a few seconds:

Voice cloning

Lastly, the most amazing feature of this model is the voice cloning from only a few seconds of audio recording.

Like in the previous post, I took some 30 seconds of Ultron's voice from the film Avengers: Age of Ultron.

Sample in spanish:

Sample in english:

Now, let's prepare a python script to set all needed parameters, which will do the following:

  • Import torch and TTS
    import torch
    from TTS.api import TTS
  • Define memory device (cuda or cpu). Using cpu should be enough (cuda might probably crash).
    device="cpu"
  • Define text to be generated.
    txt="Voice generated from text"
  • Define the reference audio sample (a .wav file of about 30 seconds)
    sample="/voice-folder/voice.wav"
  • Call to TTS model
    tts1=TTS("model_name").to(device)
  • File creation
    tts1.tts_to_file(txt, speaker_wav=sample, language="es", file_path="output-folder/output-file.wav")

I called a script TRW-clone.py looking like this:

import torch
from TTS.api import TTS

# Get device ('cuda' or 'cpu')
device="cpu"

#Define text
txt="Bienvenido a este nuevo artículo del blog. Disfruta de tu visita."
#txt="Welcome to this new block post... Enjoy your visit!"

#Define audio sample
sample="../my-voices/ultron-es/mix.wav"
#sample="../my-voices/ultron-en/mix.wav"

#Run cloning
tts1 = TTS("tts_models/multilingual/multi-dataset/xtts_v2").to(device)

tts1.tts_to_file(txt, speaker_wav=sample, language="es", file_path="../output/ultron-es.wav")

Run it from the TTS folder where the repo was installed:

cd TTS
python3 TRW-clone.py

Results

Here I drop the results I got on my first tests.

Spanish:

English:

And with a couple of iterations you can get really amazing results.

Any doubts or comments you can still drop me a line on Twitter/X

🐦 @RoamingWorkshop

🐢TorToiSe-TTS: AI text to speech generation

AI trends are here to stay, and today there’s much talk about Vall-E and its future combination with GPT-3. But we must remember that all these Artificial Intelligence products come from collaborative investigation that have been freely available, so we will always find an open-source equivalent, and we must be thankful about it.

That’s the case of TorToiSe-TTS (text to speech), an AI voice generator from written text totally free to use in your PC.

https://github.com/neonbjb/tortoise-tts

Just listen to a little sample below from Morgan Freeman:

Installation

The easiest is to use the cloud script in Google Collab uploaded by the developer:

https://colab.research.google.com/drive/1wVVqUPqwiDBUVeWWOUNglpGhU3hg_cbR?usp=sharing

You just need to sign in and click "play" ▶ to run each block of code.

But for sure you want to run TorToiSe-TTS locally, without internet, and save the audio in your local drive, so let's move on.

Installing python3

Like many AI applications, TorToiSe-TTS runs in python, so you need python3 in your PC. I always recommend the use of Linux, but you might be able to run it in a Windows terminal as well.

https://www.python.org/downloads/

On Linux, just install it from your distro repo:

sudo apt-get update
sudo apt-get install python3.11

You'll also need the module venv to virtualize a python environment (it uses to come with the Windows installer):

sudo apt-get install python3.11-venv

Download repository

Download the official repository:

https://github.com/neonbjb/tortoise-tts

Be it the compressed file:

Or using git:

git clone https://github.com/neonbjb/tortoise-tts

You can also download my fork repository, where I add further installation instructions, a terminal automatic launcher and some test voices for Ultron (yes, Tony Stark's evil droid) which we'll see later on.

https://github.com/TheRoam/tortoise-tts-linuxLauncher

Create a python virtual environment

Next we'll have to install a series of python modules needed to run TorToiSe-TTS, but before this, we'll create a virtual python version, so the installation of these modules won't affect the rest of the python installation. You'll find this helpful when you use different AI apps that use different versions of the same module.

Open a terminal and write the following, so you'll create a "TTS" environment:

cd tortoise-tts
python3 -m venv TTS

Activate it this way:

source TTS/bin/activate

And now you'll see a referente to the TTS environment in the terminal:

(TTS) abc@123:~$ |

Install python modules

Let's now install the required modules, following the collab indications:

https://colab.research.google.com/drive/1wVVqUPqwiDBUVeWWOUNglpGhU3hg_cbR?usp=sharing#scrollTo=Gen09NM4hONQ

pip3 install -U scipy
pip3 install transformers==4.19.0
pip3 install -r requirements.txt
python3 setup.py install

Now you can try running TorToiSe-TTS, but some libraries will fail, depending on your python installation:

python3 scripts/tortoise_tts.py "This is The Roaming Workshop" -v "daniel" -p "fast" -o "test1.wav"

Try the previous command until you don't get any errors, installing the missing moules. In my case, they were the following:

pip3 install torch
pip3 install torchaudio
pip3 install llvmlite
pip3 install numpy==1.23

Finally, this test1.wav sound like this in the voice of daniel (which turns out to be Daniel Craig):

Using TorToiSe-TTS

The most simple program in TorToiSe-TTS is found in the folder scripts/tortoise_tts.py and these are the main arguments:

python3 scripts/tortoise_tts.py "text" -v "voice" -V "route/to/voices/folder" --seed number -p "fast" -o "output-file.wav" 
  • "text": text chain that will be converted to audio
  • -v: voice to be used to convert text. It must be the name of one of the folders available in /tortoise/voices/
  • -V: specifies a folder for voices, in the case that you use a custom one.
  • --seed: seed number to feature the algorithm (can be any number)
  • -p: preset mode that determines quality ("ultra_fast", "fast", "standard", "high_quality").
  • -o: route and name of the output file. You must specify the fileformat, which is .wav

If you use my repo script TTS.sh you'll be asked for these arguments on screen and it will run the algorithm automatically.

Add your own voices

You can add more voices to TorToiSe-TTS. For example, I wanted to add the voice of Ultron, the Marvel supervillain, following the developer Neonbjb indications:

  • You must record 3 "clean" samples (without background noise or music) of about 10 seconds duration.
  • The format must be 16bits floating point WAV with 22500 sample rate (you can use Audacity)
  • Create a new folder inside /tortoise/voices (or anywhere, really) and save your recordings there.
  • When running TorToiSe-TTS, you'll need to call the voices folder with argument -V and the new voice with argument -v

For example, to use my Ultron recordings:

python3 sripts/tortoise_tts.py "This is The Roaming Workshop" -V "./tortoise/voices" -v "ultron-en" -p "fast" --seed 17 -o "./wavs/TRW_ultron3.wav"

Which sound like this:

I've taken cuts from a scene in Avengers: age of Ultron, both in English (ultron-en) and Spanish (ultron-es) which you can download from my repository.

"Ultron supervillain" by Optimised Stable Diffusion + Upscayl 2. The Roaming Workshop 2023.

Right now, the TorToiSe-TTS model is trained only in English, so it only woks properly in this language.

You can introduce text in another language, and AI will try to read it, but it will use the pronunciation learnt in English and it will sound weird.

If you are willing to train a model in your language (you need plenty GPU and several months), contact the developer, as he's keep to expand the project.

In the meantime, you can send any doubts or comments on 🐦 Twitter or 🐤 Koo!

🐦 @RoamingWorkshop

🐤 @TheRoamingWorkshop

Dalle-playground: AI image generation local server for low resources PCs

AI image generation has a high computational cost. Don’t trust the speed of Dall·E 2 API that we saw in this post; if these services are usually paid, it’s for a reason and, apart from the online services that we also saw, running AI in an average computer is not so simple.

After trying, in vane, some open-source alternatives like Pixray or Dalle-Flow, I finally bring the most simple of them: dalle-playground. This is a starting version of Dalle, so you won’t obtain the best of the results.

Despite this, I will soon bring an alternative to Dall·E (Stable Diffusion from stability.ai), which also supports a version optimized by the community for low resources PCs.

Requirements

"Computer hardware elements" by dalle-playground

Hardware

Just for you to picture it, Pixray recommends a minimum 16GB of VRAM and Dalle-Flow 21GB. VRAM or virtual RAM is the rapid access memory in your graphics card (don't confuse it with the usual RAM memory).

A standard laptop like mine has a Nvidia GeForce GTX1050Ti with 3GB dedicated VRAM, plus 8GB RAM on board.

With this minimum requirement, and some patience, you can run Dalle-playground locally in your PC, although it also requires an internet connection to check for updated python modules and AI checkpoints.

If you have one or several more powerful graphic cards, I would recommend trying Pixray, as it installs relatively easy and it's well documented and extended.

https://github.com/pixray/pixray#usage

Software

Software requirements aren't trivial either. You'll need python and Node.js. I will show the main steps for Linux, which is more flexible when installing all kinds of packages of this kind, but this is equally valid for Windows or Mac if you manage yourself on a terminal or using docker.

Download dalle-playground

I found this repository by chance, just before it was updated for Stable Diffusion V2 (back in November 2022) and I was smart enough to clone it.

Access and download all the repository from my github:

https://github.com/TheRoam/dalle-playground-DalleMINI-localLinux

Or optionally download the original repository with Stable Diffusion V2, but this requires much more VRAM:

https://github.com/saharmor/dalle-playground/

If you use git you can clone it directly from the terminal:

git clone https://github.com/TheRoam/dalle-playground-DalleMINI-localLinux

I renamed the folder locally to dalle-playground.

Install python3 and required modules

All the algorithm works in python in a backend. The main repository only mentions the use of python3, so I assume that previous versions wont work. Check your python version with:

>> python3 -V
Python 3.10.6

Or install it from its official source (it's currently on version 3.11, so check which is the latest available for your system):

https://www.python.org/downloads/

Or from your Linux repo:

sudo apt-get install python3.10

You'll also need the venv module to virtualize dalle-playground's working environment so it won't alter the whole python installation (the following is for Linux as it's included in the Windows installer):

sudo apt-get install python3.10-venv

In the backend folder, create a python virtual environment, which I named after dalleP:

cd dalle-playground/backend
python3 -m venv dalleP

Now, activate this virtual environment (you'll see that the name appears at the start of the terminal line):

(dalleP) abc@123: ~dalle-playground/backend$

Install the remaining python modules required by dalle-playground which are indicated in the file dalle-playground/backend/requirements.txt

pip3 install -r requirements.txt

Apart from this, you'll need pyTorch, if not installed yet:

pip3 intall torch

Install npm

Node.js will run a local web server which will act as an app. Install it from the official source:

https://nodejs.org/en/download/

Or from your Linux repo:

sudo apt-get install npm

Now move to the frontend folder dalle-playground/interface and install the modules needed by Node:

cd dalle-playground/interface
npm install

Launch the backend

With all installed let's launch the servers, starting with the backend.

First activate the python virtual environment in the folder dalle-playground/backend (if you just installed it, it should be activated already)

cd dalle-playground/backend
source dalleP/bin/activate

Launch the backend app:

python3 app.py --port 8080 --model_version mini

The backend will take a couple of minutes (from 2 to 5 minutes). Wait for a message like the following and focus on the IP addresses that appear at the end:

--> DALL-E Server is up and running!
--> Model selected - DALL-E ModelSize.MINI
 * Serving Flask app 'app' (lazy loading)
 * Environment: production
   WARNING: This is a development server. Do not use it in a production deployment.
   Use a production WSGI server instead.
 * Debug mode: off
INFO:werkzeug:WARNING: This is a development server. Do not use it in a production deployment. Use a production WSGI server instead.
 * Running on all addresses (0.0.0.0)
 * Running on http://127.0.0.1:8080
 * Running on http://192.168.1.XX:8080

Launch frontend

We'll now launch the Node.js local web server, opening a new terminal:

cd dalle-playground/interfaces
npm start

When the process finishes, it will launch a web browser and show the graphical interface of the app.

Automatic launcher

In Linux you can use my script launch.sh which starts backend and frontend automatically following the steps above. Just sit and wait for it to load.

launch.sh

#!/bin/bash
#Launcher for dalle-playground in Linux terminal

#Launchs backend and frontend scripts in one go
$(bash ./frontend.sh && bash ./backend.sh &)

#Both scripts will run in one terminal.
#Close this terminal to stop the programm.

backend.sh

#!/bin/bash
#Backend launcher for dalle-playground in Linux terminal

#move to backend folder
echo "------ MOVING TO BACKEND FOLDER ------"
cd ./backend

#set python virtual environment
echo "------ SETTING UP PYTHON VIRTUAL ENVIRONMENT ------"
python3 -m venv dalleP
source dalleP/bin/activate

#launch backend
echo "------ LAUNCHING DALLE-PLAYGROUND BACKEND ------"
python3 app.py --port 8080 --model_version mini &

frontend.sh

#!/bin/bash
#Frontend launcher for dalle-playground in Linux terminal

#move to frontend folder
echo "------ MOVING TO FRONTEND FOLDER ------"
cd ./interface

#launch frontend
echo "------ LAUNCHING DALLE-PLAYGROUND FRONTEND ------"
npm start &

App dalle-playground

In the first field, type the IP address for the backend server that we saw earlier. If you're accessing from the same PC, you can use the first one:

http://127.0.0.1:8080

But you can access from any other device in your local network using the second one:

http://192.168.1.XX:8080

Now introduce the image description to be generated in the second field, and choose the number of images to show (more images will take longer).

Press [enter] and wait for the image to generate (about 5 minutes per image).

And there you have your first local AI generated image. I will include a small gallery of results below. And in the next post I will be showing how to obtain better results using Stable Diffusion, also for lower than 4GB VRAM.

You know I await your doubts and comments on 🐦 Twitter!

🐦 @RoamingWorkshop

Note: original images at 256x256 pixels, upscaled using Upscayl.

Installing UnityHub in Ubuntu 22

If you recently updated to Ubuntu 22 and tried to install UnityHub following the steps in their website:

https://docs.unity3d.com/hub/manual/InstallHub.html#install-hub-linux

Everything looks fine until you run the program and this happens:

>> unityhub
This error originated either by throwing inside of an async function without a catch block, or by rejecting a promise which was not handled with .catch(). The promise rejected with the reason:
ConnectionLost: Timeout! Cannot connect to Licensing Client within 60000ms
    at Function.fromType (/opt/unityhub/resources/app.asar/node_modules/@licensing/licensing-sdk/lib/core/ipc/licensingIpc.js:51:16)
    ...

Luckily, surfing the web you usually find the solution, and this one was in the same Unity forum:

https://forum.unity.com/threads/installing-unity-hub-on-ubuntu-22-04.1271816/#post-8136473

Let’s check the installation step by step:

Installing UnityHub on Linux

Following the official steps from their site (first link in the post):

  1. Add the Unity repository to your sources list:
    sudo sh -c 'echo "deb https://hub.unity3d.com/linux/repos/deb stable main" > /etc/apt/sources.list.d/unityhub.list'
  2. Add the public key to make it trustful:
    wget -qO - https://hub.unity3d.com/linux/keys/public | sudo apt-key add -
  3. Update your repositories:
    sudo apt update
  4. Install UnityHub:
    sudo apt-get install unityhub

It should all go fine, despite an error with some “chrome-sandbox” folder. But that’s not the error. Running unityhub from the terminal we have the above error.

Installing libssl1.1

The problem is that Ubuntu 22 uses a more recent version of libssl package, but we can still download the version used by Ubuntu 20.

  1. Access Ubuntu 20 packages site, where you find libssl1.1
    https://packages.ubuntu.com/focal/amd64/libssl1.1/download
  2. Right-click -> save as… over the link to the file starting with security.ubuntu.com/ubuntu… (or just click the link below; you’ll download a .deb instaler file)
    http://security.ubuntu.com/ubuntu/pool/main/o/openssl/libssl1.1_1.1.1f-1ubuntu2.16_amd64.deb
  3. Double-click the downloaded file and install the package.
  4. Now run unityhub in the terminal and done!

🐦 @RoamingWorkshop

Dall·E 2 Beta: image generation using artificial intelligence (AI)

I had this pending for a while, and by following some Tweets and the project GOIA by Iker Jiménez, it seemed that AI image generation had become really accessible. And it is. There’s enormous advance in this field. But it all has a price.

Image generation from OpenAI, one of Elon Musk giants, named after Dall·E, launched its open API for everyone to test.

It’s got 18$ credit to use during 3 months only by signing up. The rest needs to be paid, but you’ll have enough for making tests, and the it’s only 0.02$ per picture. Additionally it’s easy to use and the results are great.

It’s worth trying it to know what’s the top and at the end I will show you what we, the rest, of the mortals can use daily.

But first… let’s start with a picture of Teide volcano in Tenerife. Is it real or virtual?

Teide picture, Tenerife, created with Dall·E 2 by OpenAI. The Roaming Workshop 2022.

OpenAI API

Ok, very quickly, OpenAI is the Artifitial Intelligence (AI) megaproject from Elon Musk & Co. Within the numerous capabilities of this neuronal networks, we can generate images from natural language text, but there's much more.

IA will make our life easier in the future, so have a look at all the examples that are open during Beta testing:

https://beta.openai.com/examples/

Basically, a computer is "trained" with real, well featured, examples so, from them, the computer generates new content to satisfy a request.

The computer will not generate exactly what you want or think, something expected, but it will generate it's own result from your request and what it has been learning during training.

Image generation from natural language might the the most graphical application, but the potential is unimaginable. Up there I just asked Dall·E for the word "Teide". But, what if we think about things that have not happened, that we have not seen, or simple imaginations? Well, AI is able to bring to life your thoughts. Whatever you can imagine is shown on screen.

Now, let's see how to use it.

Dall·E 2 API

To "sell us" the future, OpenAI makes it very easy. We'll find plenty documentation to spend hours in a Beta trial version completely open for three months, and you'll only need an email address.

Sign up to use Dall·E 2 from their web site, pressing Sign Up button.

https://openai.com/dall-e-2/

You'll have to verify your email address and then log into your account. Be careful because you'll be redirected to the commercial site https://labs.openai.com

The trial site is this one:

https://beta.openai.com

Create an API key

From the top menu, click on your profile and select View API keys.

If you've just registered, you'll have to generate a new secret, then copy it somewhere safe, as you'll need it to use the API commands.

Using Dall·E 2

That's it. No more requirements. Let's start playing!

Let's see how to generate and image according to the documentation:

https://beta.openai.com/docs/api-reference/images/create

To keep it simple we can use curl, so you just need to open up a terminal, be it in Window, MacOS or Linux. The code indicated is the following:

curl https://api.openai.com/v1/images/generations \
  -H 'Content-Type: application/json' \
  -H 'Authorization: Bearer YOUR_API_KEY' \
  -d '{
  "prompt": "A cute baby sea otter",
  "n": 2,
  "size": "1024x1024"
}'

Here we need to type our secret key in place of YOUR_API_KEY.

Also write a description for the image you want inside prompt.

With n we define the number of images generated by this request.

And size is the picture size, allowing 256x256, 512x512, o 1024x1024.

I'm going to try with "a map of Mars in paper".

curl https://api.openai.com/v1/images/generations -H "Content-Type: application/json" -H "Authorization: Bearer sk-TuApiKeyAqui" -d "{\"prompt\":\"A map of Mars in paper\",\"n\":1,\"size\":\"1024x1024\"}"

TIP! Copy+paste this code in your terminal, replacing your secret key "sk-..." and the prompt.

You'll get back an URL as a response to your request, which is a web link to the generated image.

Open the link to see the result:

"A map of Mars in paper" with Dall·E 2. The Roaming WorkShop 2022.

Amazing!

Pricing

Well, well... let's get back to Earth. You wouldn't think this speed and quality would be free, would you? Go back to your OpenAI account where you can see the use that you make fo the API and how you spend your credit.

https://beta.openai.com/account/usage

As I was saying earlier, the Beta offers 18$ to spend during 3 months and every picture in 1024px is about 0,065$ (0,002$ for lowest quality).

All the main AI platforms similar to OpenAI (Midjourney, Nightcafe, DreamAI, etc) work this way, offering some credit for use, as it is the powerful performance of their servers what is being traded.

Alternatives (free ones)

There are various open-source and totally free alternatives. I invite you to try them all and choose the one you like the most, but I must warn you that there are many software and hardware requisites. You specially need a good graphic card (or several of them). In the end, you need to put in the balance how much you'll use the AI, and if it's not worth spending a couple cents for a couple pictures every now and then.

From the 4 recommendations below I have successfully tested the last two, the least powerful of them:

1. Pixray

https://github.com/pixray/pixray

Looks promising for its simple installation and use. Don't trust the picture above (it's their pixelated module) because it has plenty of complex options for very detailed image generation.

There is also plenty documentation made by users and support via Discord.

On the other hand, they recommend about 16GB of VRAM (virtual RAM from the GPU of your graphic card). I crashed for insufficient memory without seeing the results...

2. Dalle-Flow

https://github.com/jina-ai/dalle-flow#Client

Very technical and complex. The results look brilliant, but I couldn't achieve installation or web use. It uses several specific python modules that supposedly run on Google Colab. Or it's discontinued and it's currently broken, or the documentation is poor, or I'm a completely useless on this... Additionally the recommend about 21GB of VRAM to run standalone, although it could be shared using Colab... I could never check.

3. Craiyon

https://www.craiyon.com/

The former Dalle-mini created by Boris Dayma has a pactical web version totally free (no credit or payments, only a few ads while loading).

Although results aren't brilliant from scratch, we can improve them using Upscayl (I'll tell you more about it later).

4. Dalle-playground

https://github.com/saharmor/dalle-playground/

One of the many repositories derived from dalle-mini, in this case comes in a handy package that we can use freely with no cost in our home PC having very little hardware and software requirements. It runs as a local webapp in your browser as it generates a server that you can access anywhere in your network.

Together with Upscayl, they make good tandem to generate AI images in your own PC for free.

In the next post we'll see how to generate this images in our ordinary PC, with Dalle-playground y Upscayl.

That's all for now! I wait your doubts or comments about this Dall·E post on 🐦 Twitter!

🐦 @RoamingWorkshop

Stellarium: the sky you’ll have tonight with the open planetarium

Did you wonder where did I get the header picture?

It’s not from the internet, not from any telescope. It’s from the great software Stellarium, an open-source planetarium with astronomical precision and unbeatable realism.

Requirements

Stellarium is available for Windows, Mac and Linux, with a web version seamingly amazing, but lacking the configuration and plugins options that are offered by the desktop versions.

As they indicate in their website, the minimum requirements are:

  • Linux/Unix; Windows 7 and above; Mac OS X 10.12.0 and above
  • 3D graphics card which supports OpenGL 3.0 and GLSL 1.3 or OpenGL ES 2.0
  • 512 MiB RAM
  • 600 MiB on disk
  • Keyboard
  • Mouse, Touchpad or similar pointing device

And recommended:

  • 64-bit operating system
  • Linux/Unix; Windows 7 and above; Mac OS X 10.12.0 and above
  • 3D graphics card which supports OpenGL 3.3 and above
  • 1 GiB RAM or more
  • 1.5 GiB on disk
  • Keyboard
  • Mouse, Touchpad or similar pointing device
  • Moderately dark environment (deep shadow or indoors)

Basically it works in almost any device. Just download it from one of the options in the top menu.

Initial configuration

At startup, the position of all objects is synchronized with the PC time and it will be updated in real-time.

Using the bottom menu (or its [shortcuts] ) we can activate/disable different view elements. I recommend that you play with all of them and set it as you like:

  • Constellation lines [C].
  • Constellation labels [V].
  • Constellation art [R].
  • Equatorial grid [E].
  • Azimuthal grid [Z].
  • Ground [G].
  • Atmosphere [A].
  • Cardinal points [Q].
  • Deep-sky objects [D].
  • Planet labels [Alt+P].
  • Switch between equatorial or azimuthal mount [Ctrl+M].
  • Center on selected object [Space].
  • Night mode [Ctrl+N].
  • Full-screen mode [F11].
  • Show exoplanets [Ctrl+Alt+E].
  • Toggle meteor showers [Ctrl+Shift+M].
  • Show meteor showers search dialog [Ctrl+Alt+M].
  • Satellite hints [Ctrl+Z].
  • Decrease time speed [J].
  • Set normal time rate [N].
  • Set time to now [8].
  • Increase time speed [L].
  • Quit [Ctrl+Q].

On the lateral menu we have the following options:

  • Location window [F6]. Here we can specify the location of our view, being a place on Earth or any other planet in the list.
  • Date/time window [F5]. We can choose any date from past or future as the orbits are perfectly known for centuries.
  • Sky and viewing options window [F4]. It lets us calibrate the visibility of objects, the projection or the landscape picture, between others.
  • Search window [F3]. It will locate an object from space by its name.
  • Configuration window [F2]. Shows settings like language, system time, the use of extras or scripts, etc.
  • Astronomical calculations window [F10]. Shows the details of calculations done by the software, like object positions, or events that occur today.
  • Help window [F1].

Uses

We can simply disable the atmosphere [A] and investigate the objects in space left-clicking on them, which will show information about the selected object. If we press [Space] the view will follow the object.

We can also activate constellation lines [C] and labels [V], show meteor showers [Ctrl+Shift+M] and advance time until the sun sets [F5] or [L]. This way we can find out if there will be a starry night (or any other night) and know its location.

Now in August we are reaching the Perseidas maximum activity, that will occur on 13th August according to the calculations for the Iberian peninsula, and will be located moving from North to Northeast.

Or simply play with the many possibilities of the software and get an incredible background picture like the one used on the header of this blog.

Do you imagine any other possibilities for the software? Any configuration tip or any worth script? Leave your comment on Twitter 🐦 See you soon!

🐦 @RoamingWorkshop