
Estaba preparando un artículo donde quería insertar un modelo 3D para ilustrarlo mejor, y pensaba incluso en hacer un visor yo mismo. Pero no tuve que surfear mucho para encontrarme con Three.js.
¡Si es que está ya todo inventado!
Enlazar la librería CDN
Para este ejemplo, haremos un visor "portable" enlazando las librerías al CDN oficial, en lugar de tener que descargarnos los ficheros a nuestro servidor.
De esta forma, el archivo de ejemplo te servirá en cualquier lugar con conexión a internet. Vamos a crear un fichero .html básico como el que nos sugieren en la documentación:
https://threejs.org/docs/index.html#manual/en/introduction/Creating-a-scene
<!DOCTYPE html>
<html>
	<head>
		<meta charset="utf-8">
		<title>My first three.js app</title>
		<style>
			body { margin: 0; }
		</style>
	</head>
	<body>
        <script async src="https://unpkg.com/[email protected]/dist/es-module-shims.js"></script>

        <script type="importmap">
          {
            "imports": {
              "three": "https://unpkg.com/[email protected]/build/three.module.js"
            }
          }
        </script>

        <script>
        //App code goes here
        </script>
	</body>
</html>
Crear una escena
Vamos a seguir con el ejemplo y rellenamos el segundo bloque <script> definiendo una escena con un cubo animado en rotación:
<script type="module">
        import * as THREE from 'three';
	const scene = new THREE.Scene();
	const camera = new THREE.PerspectiveCamera( 75, window.innerWidth / window.innerHeight, 0.1, 1000 );

	const renderer = new THREE.WebGLRenderer();
	renderer.setSize( window.innerWidth, window.innerHeight );
	document.body.appendChild( renderer.domElement );

	const geometry = new THREE.BoxGeometry( 1, 1, 1 );
	const material = new THREE.MeshBasicMaterial( { color: 0x00ff00 } );
	const cube = new THREE.Mesh( geometry, material );
	scene.add( cube );

	camera.position.z = 5;

	function animate() {
		requestAnimationFrame( animate );

		cube.rotation.x += 0.01;
		cube.rotation.y += 0.01;

		renderer.render( scene, camera );
	};

	animate();
</script>
Todo eso, junto, queda así:
Añade controles de arrastre y un fondo
Ahora tenemos una base para trabajar. Puede añadir más funcionalidad insertando el módulo OrbitControls que maneja la rotación del modelo y de la cámara.
//Importa nuevos módulos al principio del script
import { OrbitControls } from 'https://unpkg.com/[email protected]/examples/jsm/controls/OrbitControls.js';

//luego, añade los controles del cursor después de declarar la cámara y el renderizador
const controls = new OrbitControls( camera, renderer.domElement );
También puedes modificar el fondo fácilmente, pero necesitas hospedar la imagen junto a la aplicación en un servidor, o ejecutarlo localmente, debido al CORS. Yo usaré la imagen de la cabecera del blog, que saqué de Stellarium.

Primero, define una textura. Luego, añádela a la escena:
//añade esto antes de renderizar, mientras defines la escena
//define la textura
const texture = new THREE.TextureLoader().load( "https://theroamingworkshop.cloud/demos/Unity1-north.png" );

//añade la textura a la escena
scene.background=texture;
Código completo:
<!DOCTYPE html>
<html>
	<head>
		<meta charset="utf-8">
		<title>My first three.js app</title>
		<style>
			body { margin: 0; }
		</style>
	</head>
	<body>
        <script async src="https://unpkg.com/[email protected]/dist/es-module-shims.js"></script>

        <script type="importmap">
          {
            "imports": {
              "three": "https://unpkg.com/[email protected]/build/three.module.js"
            }
          }
        </script>
<body style="margin: 0; width:100%;height:300px;">
        <script async src="https://unpkg.com/[email protected]/dist/es-module-shims.js"></script>

        <script type="importmap">
          {
            "imports": {
              "three": "https://unpkg.com/[email protected]/build/three.module.js"
            }
          }
        </script>

    <script type="module">

    import * as THREE from 'three';
	import { OrbitControls } from 'https://unpkg.com/[email protected]/examples/jsm/controls/OrbitControls.js';

	const scene = new THREE.Scene();

	const texture = new THREE.TextureLoader().load( "https://theroamingworkshop.cloud/demos/Unity1-north.png" );
	scene.background=texture;

    const camera = new THREE.PerspectiveCamera( 75, window.innerWidth / window.innerHeight, 0.1, 1000 );

	const renderer = new THREE.WebGLRenderer();
	renderer.setSize( window.innerWidth, window.innerHeight );
	document.body.appendChild( renderer.domElement );

    const controls = new OrbitControls( camera, renderer.domElement );

	const geometry = new THREE.BoxGeometry( 1, 1, 1 );
	const material = new THREE.MeshBasicMaterial( { color: 0x00ff00 } );
	const cube = new THREE.Mesh( geometry, material );
	scene.add( cube );

	camera.position.z = 5;

	function animate() {
		requestAnimationFrame( animate );

		cube.rotation.x += 0.01;
		cube.rotation.y += 0.01;

		renderer.render( scene, camera );
	};

	animate();
</script>
</body>
</html>
Insertar un modelo 3D
Ahora vamos a sustituir este cubo por un modelo 3D propio, que en el caso de Three.js, debe tener un formato glTF (.GLB o .GLTF), que es el formato más soportado y que renderiza más rápidamente (aunque también hay soporte para .fbx, .stl, .obj y demás).
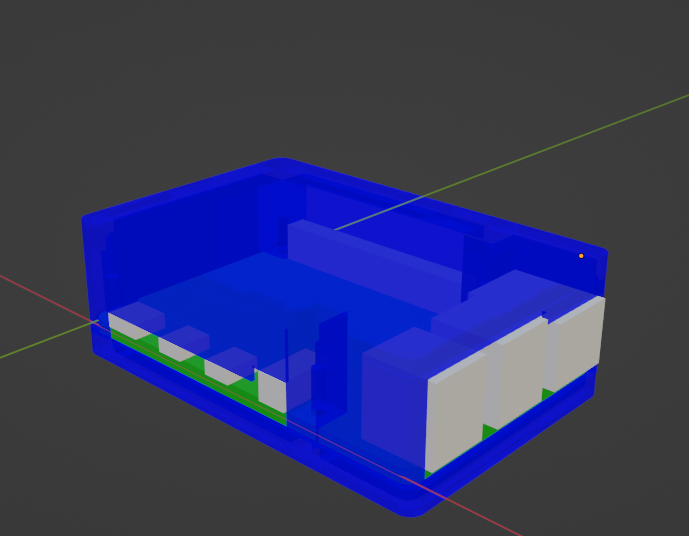
Yo exportaré a .glb esta carcasa básica de Raspberry Pi 4B que hice hace un tiempo usando Blender:

Ahora, para insertar el modelo sustituimos el bloque <script> anterior basándonos en el ejemplo "webgl_loader_gltf" que se ve al inicio del post:
<script type="module">
import * as THREE from 'three';
import { GLTFLoader } from 'https://unpkg.com/[email protected]/examples/jsm/loaders/GLTFLoader.js';
import { OrbitControls } from 'https://unpkg.com/[email protected]/examples/jsm/controls/OrbitControls.js';

let camera, scene, renderer;

init();
render();

function init() {

	const container = document.createElement( 'div' );
	document.body.appendChild( container );

	camera = new THREE.PerspectiveCamera( 30, window.innerWidth / window.innerHeight, 0.1, 20 );
    camera.position.set( 0.2, 0.2, 0.2 );

	scene = new THREE.Scene();
    scene.add( new THREE.AmbientLight( 0xffffff, 0.75 ) );

	const dirLight = new THREE.DirectionalLight( 0xffffff, 1 );
	dirLight.position.set( 5, 10, 7.5 );
	dirLight.castShadow = true;
	dirLight.shadow.camera.right = 2;
	dirLight.shadow.camera.left = - 2;
	dirLight.shadow.camera.top	= 2;
	dirLight.shadow.camera.bottom = - 2;
	dirLight.shadow.mapSize.width = 1024;
	dirLight.shadow.mapSize.height = 1024;
	scene.add( dirLight );

    //model
     const loader = new GLTFLoader();
	 loader.load( 'https://theroamingworkshop.cloud/threeJS/models/rPi4case/rPi4_case_v1.glb', function ( gltf ) {
		scene.add( gltf.scene );
		render();
	 } );

	renderer = new THREE.WebGLRenderer( { antialias: true } );

	renderer.setPixelRatio( window.devicePixelRatio );
	renderer.setSize( window.innerWidth, window.innerHeight );
	renderer.toneMapping = THREE.ACESFilmicToneMapping;
	renderer.toneMappingExposure = 1;
	renderer.outputEncoding = THREE.sRGBEncoding;
	container.appendChild( renderer.domElement );

	const controls = new OrbitControls( camera, renderer.domElement );
	controls.addEventListener( 'change', render );
    controls.minDistance = 0.001;
	controls.maxDistance = 1;
	controls.target.set( 0.03, 0.01, -0.01 );
	controls.update();
	window.addEventListener( 'resize', onWindowResize );
}
function onWindowResize() {
	camera.aspect = window.innerWidth / window.innerHeight;
	camera.updateProjectionMatrix();
	renderer.setSize( window.innerWidth, window.innerHeight );
	render();
}
function render() {
	renderer.render( scene, camera );
}
</script>
Básicamente se hace lo siguiente:
- Importar módulos a usar:
- GLTFLoader cargará nuestro modelo en formato .glb
- OrbitControls nos permite controlar la vista de la cámara
- Definir la escena:
- definir una cámara
- definir la luz (en este caso hay luz ambiente y direccional, prueba a comentar alguna de ellas y verás la diferencia)
- Cargar el modelo en la escena
- Definir los parámetros de renderizado y renderizar.
Y todo ello queda así (clicka y arrastra!):
Espero que te sea útil! Dudas o comentarios al 🐦 Twitter!
